the best way to create bar chart utilizing react js
Associated Articles: the best way to create bar chart utilizing react js
Introduction
With enthusiasm, let’s navigate by means of the intriguing matter associated to the best way to create bar chart utilizing react js. Let’s weave attention-grabbing data and provide recent views to the readers.
Desk of Content material
Creating Dynamic and Interactive Bar Charts in React.js: A Complete Information
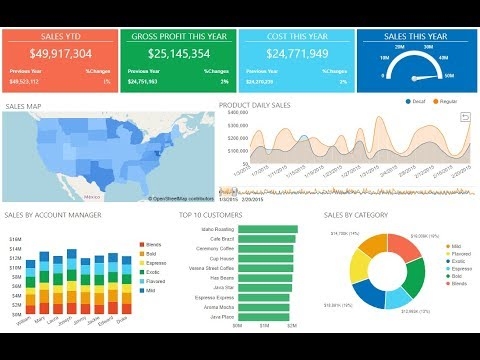
React.js, a well-liked JavaScript library for constructing person interfaces, gives a robust and versatile setting for creating visually interesting and interactive information visualizations. Bar charts, a staple of knowledge illustration, are notably well-suited to React’s component-based structure. This text gives a complete information to constructing bar charts in React, overlaying numerous strategies, complexities, and greatest practices. We’ll progress from a primary implementation to extra superior options, equipping you with the data to create refined information visualizations.
I. Elementary Ideas and Setup:
Earlier than diving into the code, let’s set up the foundational parts. Our bar chart would require:
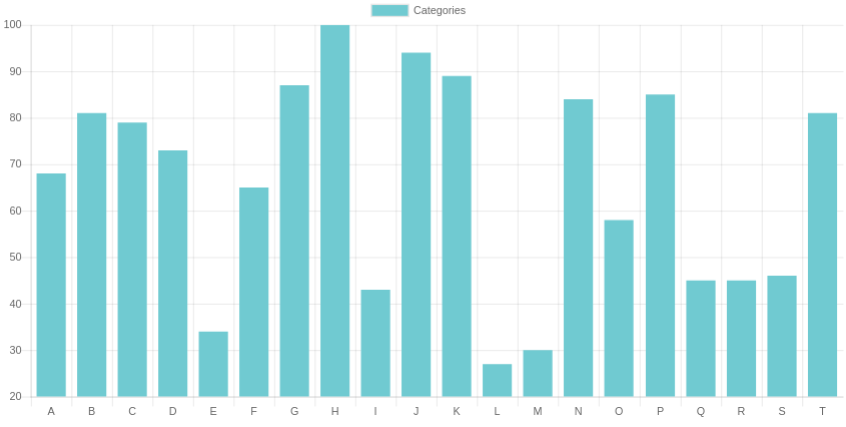
- Knowledge: An array of objects, the place every object represents an information level. Every object will sometimes have a label (e.g., class) and a price (e.g., depend). Instance:
const information = [
   label: 'Category A', value: 25 ,
   label: 'Category B', value: 40 ,
   label: 'Category C', value: 15 ,
   label: 'Category D', value: 30 ,
];-
React Parts: We’ll create reusable elements for the chart’s parts: a
BarChartelement to handle the general construction, and aBarelement to render particular person bars. -
Styling: We’ll leverage CSS (or a CSS-in-JS resolution like styled-components or emotion) to type the chart’s look.
-
Libraries (Optionally available): Whereas we are able to construct a bar chart from scratch, libraries like Recharts, Nivo, or Chart.js can considerably simplify the method, providing pre-built elements and functionalities. We’ll discover a primary implementation with no library first, then briefly contact upon utilizing Recharts.
II. Constructing a Primary Bar Chart from Scratch:
Let’s begin by making a primary bar chart with out exterior libraries. This strategy helps perceive the underlying ideas.
import React from 'react';
import './BarChart.css'; // Import CSS file

const BarChart = ( information ) =>
  const maxValue = Math.max(...information.map(merchandise => merchandise.worth));
  const barHeight = 20; // Regulate as wanted
  const chartHeight = information.size * barHeight + 20; // Add padding

  return (
    <div className="bar-chart" type= peak: `$chartHeightpx` >
      information.map((merchandise, index) => (
        <div key=index className="bar-container">
          <div className="bar" type= peak: `$(merchandise.worth / maxValue) * chartHeightpx`, width: '50px' >
            <span className="bar-label">merchandise.label</span>
          </div>
        </div>
      ))
    </div>
  );
;

export default BarChart;BarChart.css:
.bar-chart
  show: flex;
  flex-direction: column;
  width: 300px; /* Regulate width as wanted */
  border: 1px stable #ccc;


.bar-container
  width: 100%;
  show: flex;
  align-items: flex-end;


.bar
  background-color: #4CAF50; /* Customise bar colour */
  margin-bottom: 5px;
  place: relative; /* For label positioning */


.bar-label
  place: absolute;
  prime: -15px; /* Regulate vertical place */
  left: 5px; /* Regulate horizontal place */
  font-size: 12px;
This code dynamically calculates bar heights based mostly on the utmost worth within the dataset, making certain correct scaling. The CSS gives primary styling; you possibly can customise it extensively.
III. Enhancing the Bar Chart:
Our primary chart lacks a number of options essential for a strong visualization:
- Tooltips: Displaying information values on hover.
- Responsive Design: Adapting to completely different display screen sizes.
- Axis Labels: Clearly labeling axes.
- Customizable Styling: Permitting customers to alter colours, fonts, and so on.
- Interactive Components: Enabling person interplay like zooming or filtering.
Let’s handle a few of these enhancements. Including tooltips requires managing state and utilizing occasion listeners:
import React,  useState  from 'react';
import './BarChart.css';

const BarChart = ( information ) =>
  const [tooltipData, setTooltipData] = useState(null);

  // ... (remainder of the code stays largely the identical)

  const handleMouseEnter = (merchandise) =>
    setTooltipData(merchandise);
  ;

  const handleMouseLeave = () =>
    setTooltipData(null);
  ;

  return (
    <div className="bar-chart">
      information.map((merchandise, index) => (
        <div key=index className="bar-container"
             onMouseEnter=() => handleMouseEnter(merchandise)
             onMouseLeave=handleMouseLeave>
          <div className="bar" type= peak: `$(merchandise.worth / maxValue) * chartHeightpx` >
            <span className="bar-label">merchandise.label</span>
          </div>
          tooltipData && tooltipData.label === merchandise.label && (
            <div className="tooltip">`$merchandise.label: $merchandise.worth`</div>
          )
        </div>
      ))
    </div>
  );
;

export default BarChart;
Keep in mind so as to add CSS for the tooltip:
.tooltip
  place: absolute;
  background-color: #333;
  colour: #fff;
  padding: 5px 10px;
  border-radius: 5px;
  left: 60px; /* Regulate place as wanted */
  prime: -20px; /* Regulate place as wanted */
This improved model shows a tooltip when hovering over a bar. Including axis labels and responsive design requires extra important CSS changes and doubtlessly utilizing a extra refined structure strategy.
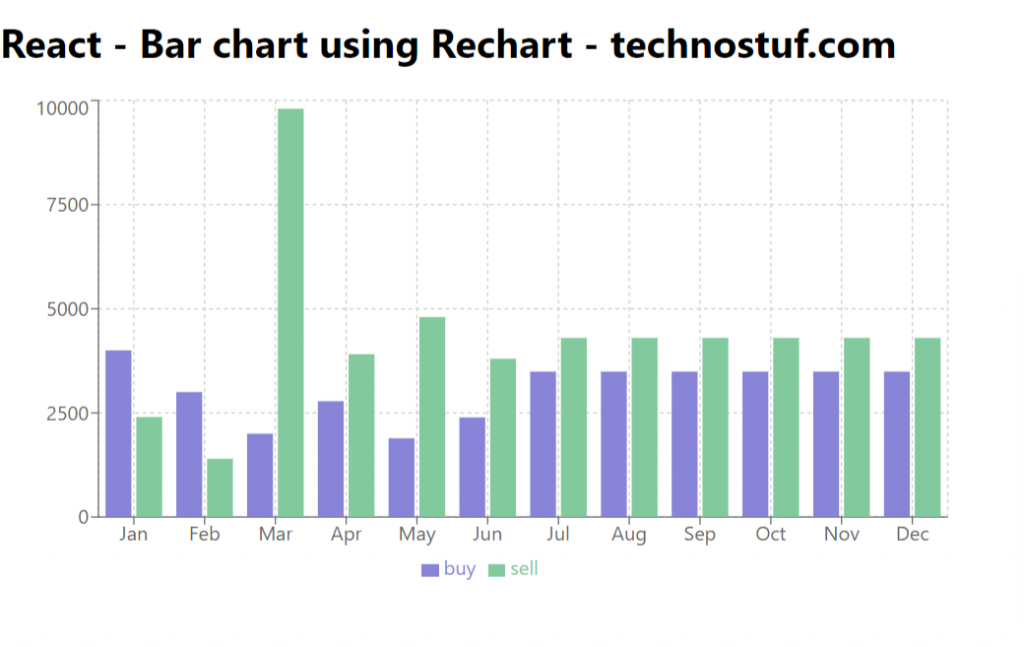
IV. Utilizing a Charting Library: Recharts
Whereas constructing from scratch gives worthwhile understanding, utilizing a library considerably simplifies growth. Recharts is a well-liked React charting library. Let’s examine the best way to create a bar chart with it:
import React from 'react';
import  BarChart, Bar, XAxis, YAxis, CartesianGrid, Tooltip, Legend  from 'recharts';

const MyBarChart = ( information ) =>
  return (
    <BarChart width=500 peak=300 information=information>
      <CartesianGrid strokeDasharray="3 3" />
      <XAxis dataKey="label" />
      <YAxis />
      <Tooltip />
      <Legend />
      <Bar dataKey="worth" fill="#8884d8" />
    </BarChart>
  );
;

export default MyBarChart;
This concise code leverages Recharts’ pre-built elements to create a purposeful bar chart with tooltips and a legend. Recharts gives intensive customization choices, permitting you to fine-tune each side of the chart’s look and habits.
V. Superior Options and Issues:
- Animations: Libraries like Recharts and Nivo provide built-in animation capabilities, making your charts extra partaking.
- Knowledge Transformations: Pre-processing your information earlier than rendering can considerably enhance efficiency and simplify chart logic.
- Accessibility: Guarantee your charts are accessible to customers with disabilities by offering applicable ARIA attributes and alt textual content.
- Efficiency Optimization: For big datasets, take into account strategies like virtualization or utilizing a extra performant library.
- Interactive Options: Implement options similar to zooming, panning, and filtering to boost person engagement and exploration of the info.
VI. Conclusion:
Creating bar charts in React can vary from a easy train to a posh undertaking relying in your wants. Beginning with a primary implementation helps grasp elementary ideas, whereas using libraries like Recharts or Nivo streamlines the event course of for extra superior visualizations. Keep in mind to prioritize accessibility, efficiency, and a user-friendly expertise when designing your information visualizations. By combining your understanding of React’s element mannequin with the capabilities of charting libraries, you possibly can create compelling and informative bar charts that successfully talk your information. Constantly discover the documentation and examples offered by these libraries to unlock their full potential and create refined information visualizations in your functions.


Closure
Thus, we hope this text has offered worthwhile insights into the best way to create bar chart utilizing react js. We hope you discover this text informative and helpful. See you in our subsequent article!